Map Editor
The Map Editor is the heart of the Tour Builder. Once you have uploaded a map image for your tour, you can do practically everything from the Map Editor, or get to where you need to go from the Map Editor.
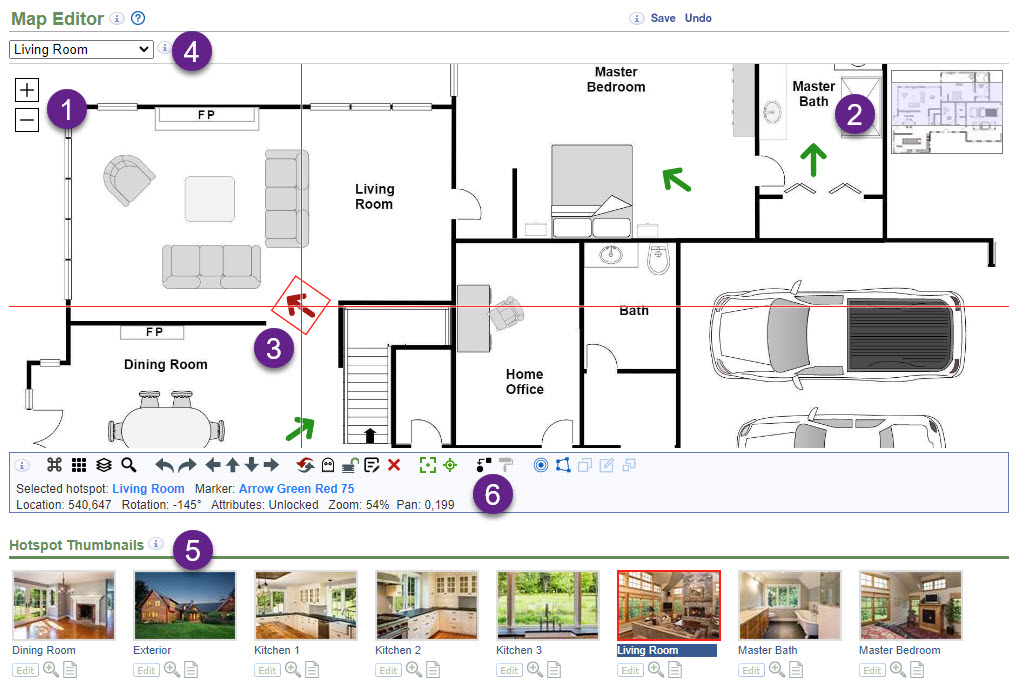
A screenshot of the Map Editor appears below with numbered circles identifying key features:
- Controls for zooming the map in and out.
- Inset showing how the map is zoomed.
- Markers (arrows on this map). The selected marker appears inside red cross-hairs.
- List of hotspot names you can choose from to select a hotspot's marker on the map.
- Hotspot thumbnails you can click to select that hotspot's marker on the map.
- Toolbar of Map Editor controls (explained in the next section).
How to get to the Map Editor

- Click the map icon (red arrow ) or choose Map > Map Editor from the Tour Builder Menu.
How to set the size of the Map Editor
The dimensions of the Map Editor are determined by the tour's width and height setting on the Advanced Tour Layout screen.
You cannot change the size of the Map Editor for a Classic tour unless you change the tour's size and/or its layout. This is because the width and height of the Map Editor are the same as the dimensions of the tour's map area when the tour is displayed at its full size (not scaled down to fit a smaller browser window). The dimensions of the tour's map area are determined by the tour's layout and the values of the Width and Height options you specified for the tour on the Advanced Tour Layout screen.
The tour Width and Height values you specify for a Flex Map tour on the Advanced Tour Layout screen determine the size of the Map Editor. Those values do not affect the tour size because the maps in a Flex Map tour automatically size to best fit the device they are being displayed on. Therefore, you can change the tour width and height values for a Flex Map tour to make the Map Editor larger or smaller without affecting the size of the tour itself.
Map Editor Controls
The table below explains the controls that appear in the Map Editor toolbar. Some of the descriptions say to "Use Ctrl" to alter the behavior of the control. Depending on your keyboard and operating system, this will be one of these keys: Ctrl, Command, or Cmd. If you are using a device that has no Ctrl key, you can use the Soft Ctrl Key.
Many of the controls have keyboard shortcuts as identified in the table below. You can disable the keyboard shortcuts by choosing the Disable Keyboard Shortcuts option on the Tour Manager screen.
| Control | Description |
|---|---|
 |
Soft Ctrl Key Provides a soft Ctrl key that you can touch on devices that have no keyboard. When you touch this control its icon becomes underlined to show that it is active. It stays active for just one map operation, as if you had pressed an actual Ctrl key, performed an operation and then released the key. As such, if you want to Ctrl-click multiple markers to select them, you need to first touch this control, then touch a marker, and touch this control again to select the next marker. |
 |
Select all markers Selects all the markers on the map. This is useful if you want to lock or unlock all of the markers, or if you want to nudge or drag all of them. Use Ctrl to deselect all markers. |
 |
Enable over-zoom1 Lets you zoom the map beyond 100% while in the map editor. Click the icon to enable over-zooming and click it again to restore the zoom level to 100%. The control appears underlined when active. This is useful for more accurate placement of markers and for precise positioning of handles when editing a shape marker. When zoomed past 100%, the zoom-in control (+) will have a red background. Keyboard shortcut: Once the map is zoomed to 100%, you can over-zoom by holding down the Shift key when you click the zoom-in (+) control or when zooming by using the mouse scroll-wheel. |
  |
Rotate Marker Rotates the selected marker(s) by 5° in a counter-clockwise or clockwise direction. Use Ctrl to rotate by 1°. You cannot use the rotate controls while editing a shape marker and you cannot edit the shape of a rotated marker. |
    |
Nudge Marker / Nudge Handle Nudges the selected marker(s) by 5 pixels left, up, down, or right. Use Ctrl to nudge by 1 pixel. You can also use these controls to nudge the selected edit handle(s) when editing a shape marker. Keyboard shortcut: Use the keyboard arrow keys to nudge markers or handles. |
  |
Align Markers / Align Handles Aligns the selected markers in a column or a row. These controls only appear when at least two markers or edit handles are selected. Markers are aligned to the marker that has crosshairs. You can also use these controls to align edit handles on shape markers. Handles are aligned to the red handle. Keyboard shortcut: When two or more markers or handles are selected, press the c key to align in a column or press the r key to align in a row. |
 |
Toggle Marker Appearance Toggles the selected and normal appearance for every marker on the map. This is useful for seeing markers that have a transparent normal appearance. Appears underlined when active. |
| Toggle Transparency Toggles transparency of the selected marker(s). Use it when you need to see through a marker for accurate placement. Enabled automatically while editing a marker. Appears underlined when active. |
|
  |
Lock/Unlock Marker Locks selected marker(s) so that you cannot accidentally drag them out of position. Click the unlocked icon to lock markers and click the locked icon to unlock them. When a marker is locked, its outline and crosshairs change from solid red lines to dotted black lines. If multiple markers are selected, the lock icon shows if any of the markers are locked. The unlocked icon shows if they are all unlocked. A shape marker is temporarily locked while it is being edited so that you don't accidentally move it, but if the marker is not permanently locked, you can drag it by pressing down the Ctrl key or by dragging its crosshairs. |
 |
Go To a Tour Builder Screen Displays a dialog that lets you choose one of these screens for the selected hotspot: Edit Hotspot, Hotspot Advanced Options, Edit Marker, Marker Actions, or Edit Marker Style. |
 |
Remove Marker / Delete Hotspot / Remove Handle Removes the selected marker(s) from the map, but does not delete their hotspot(s). Use Ctrl to delete the hotspot(s) for the selected marker(s). You can also use this control to remove a handle when editing a shape marker. Keyboard shortcut: Press the Delete key to remove the selected marker(s) from the map or use Ctrl-Delete to delete their hotspot(s). |
 |
Set Map Focus Sets the map focus using the default focus point. Use Ctrl to have the option to choose the focus point yourself. The icon's focus dot turns red while your are setting the focus. Learn more in the section below that explains map focus. |
 |
Show Map Focus Shows how the map is focused by drawing blue cross-hairs through the focus point, and zooming the map to the map focus zoom level. |
 |
Replace Marker1 Lets you replace the currently selected marker(s) with a different marker. |
 |
Replace Marker Style1 Lets you replace the marker style for the currently selected marker(s). |
 |
Add New Hotspot1 Adds a new hotspot to the map using a marker that you choose. |
 |
Create New Shape Marker1 Lets you create and draw a new shape marker. You can choose to create a new hotspot for the marker or use the marker for an existing hotspot. |
 |
Duplicate Marker1 Duplicates an existing shape marker. You can choose to create a new hotspot for the duplicated marker or use the marker for an existing hotspot. |
 |
Edit Marker1 Lets you begin editing a shape marker. A marker being edited displays square edit handles that you can drag to resize a circle or rectangle or change the shape of a polygon or line. A polygon or line shape also displays round breakpoint handles that you can drag to insert a new edit handle. Keyboard shortcut: Double-click a shape marker to begin editing it. Double-click the shape again to finish editing. |
   |
Convert Hybrid Marker1 Lets you convert a shape marker to a hybrid marker, convert a hybrid marker back to a shape marker, or finish editing a hybrid marker (last icon). When a single shape marker is selected, the first icon displays and the marker is outlined with a solid blue line. When a single hybrid marker is selected, the second icon displays and the marker is outlined with a dashed red line. The third icon displays while you are editing a hybrid marker. Keyboard shortcut: Press the Enter key to finish editing a hybrid marker. |
 |
Finish Editing Marker1 Commits the edits you just made to a marker, but does not save them to the database until you go to another Tour Builder screen or click the Save button. Keyboard shortcut: Double-click the marker that you are editing or press the Enter key. |
 |
Undo Last Edit1 Performs an undo of the last edit you made. Keyboard shortcut: Press Ctrl-z to undo. |
 |
Redo Last Edit1 Restores the last edit you made. Keyboard shortcut: Press Ctrl-y to redo. |
 |
Cancel Editing1 Restores a marker shape to what it was when you first began editing the marker. Keyboard shortcut: Press the Esc key to cancel editing. |
1 Feature is available with the Plus and Pro plans.
Tips for using the Map Editor Controls
Using the Map Editor is easy. The most common tasks are:
- Click a marker to select it.
- Ctrl-click a selected marker to deselect it.
- Select multiple markers on the map by Ctrl-clicking each one.
- Ctrl-click hotspot thumbnails below the map to select multiple markers.
- Deselect all selected markers by Ctrl-clicking on the map.
- Drop new markers onto the map by selecting them from the hotspot list or clicking their thumbnail.
- Drag markers to the approximate location where you want them.
- Precisely position a marker using the nudger controls or the keyboard arrow keys.
- Rotate markers that are directional, such as arrows.
- Lock markers when you are done positioning so that you can't accidentally move them.
- Zoom the map in to see more detail, or out to see more area.
- Zoom and pan the map to where it should be when the tour loads and then set the map focus.
Shape Markers
You can create and edit shape markers from the Map Editor (requires a Plus or Pro Plan).
Create a New Shape Marker
Here are the steps for creating a shape marker.
- Click the Create New Shape Marker control in the Map Editor toolbar
- On the dialog that appears:
- Choose a shape type: circle, rectangle, line, or polygon.
- Provide a name for the new marker.
- Choose whether to create a new hotspot for the marker or to use it to replace the marker for an existing hotspot.
- Specify the name for a new hotspot or choose an existing hotspot.
- Choose the marker style to use for the new marker.
- Click the Create Marker button.
- The new marker will drop down onto the center of the map.
- You can now edit the marker following the steps in the next section.
Edit a Shape Marker
Here are the steps for editing a shape marker.
- Click the marker to select it.
- To enter shape-editing mode do one of the following:
- Click the Edit Marker control in the Map Editor toolbar, or
- Double click on the marker
- The shape's appearance will change to a transparent cyan color and square edit handles will appear around the shape.
- Click-drag an edit handle to change the size of a rectangle or circle, or to move that point on a polygon or line shape.
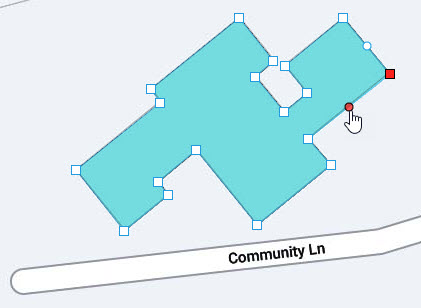
- For a polygon or line shape:
- Click a handle to select it. The handle will turn red and "magic dots" will appear between that handle and its two adjacent handles as shown in the screenshot below.
- Click-drag a magic dot to turn it into a new square edit handle and then drag it where you want.
- Ctrl-click other handles to drag, nudge, or align them.
- Click the Remove Handle control (red X) to remove selected handles
- When you are done, do one of the following:
- Click the Finish Editing Marker control (green check mark), or
- Double-click the marker, or
- Press the
Enterkey
Keyboard shortcut: Press the Tab key to selected the next handle or press Ctrl-Tab to select the previous handle.
Hybrid Markers
You can create and edit hybrid markers from the Map Editor (requires a Plus or Pro Plan). A hybrid marker contains two or more circle, rectangle, polygon, or line shapes.
Create a New Hybrid Marker
You create a hybrid marker by converting a shape marker to a hybrid marker:
- Click a shape marker to select it.
- Click the Convert Hybrid Marker Control
- Click the Convert button on the confirmation dialog.
- The marker will now appear inside a red dashed outline and the Convert Hybrid Marker control will appear as solid blue.
Edit a Hybrid Marker
Here are the steps for editing a hybrid marker.
- Click the hybrid marker to select it.
- To enter hybrid-editing mode do one of the following:
- Click the Edit Marker control in the Map Editor toolbar, or
- Double click on the marker
- The marker's parts will appear inside a cyan dashed line and all other markers will temporarily disappear from the map.
- To add a new part:
- Click the Create New Shape Marker control in the Map Editor toolbar and choose circle, rectangle, line, or polygon.
- Click the Add Shape button
- The new shape will appear in the center of the hybrid marker.
- Drag the shape to any location on the map. The cyan dashed line will expand as needed to keep enclosing all of the hybrid marker's parts.
- Edit the new part the same way as described above for a shape marker.
- Click on other parts of the hybrid marker to move, edit, or remove them.
- When you are done, click the red Convert Hybrid Marker control or press the
Enterkey.
Map Focus
Map Focus is a MapsAlive term that refers to the combination of zoom level and panning position that you want to use when your map first loads in a browser. Put another way, Map Focus lets you control what people will focus on when they see your map for the first time. The focus might be the entire map zoomed all the way out, or just a portion of the map zoomed in to a particular location.
Setting the map focus is important because you can't know what size or shape of device people will use to view your map. They might be using a large desktop monitor or a tiny mobile phone, and their phone may be in portrait or landscape orientation. By setting the map focus, you get to decide what should get their attention regardless of the device.
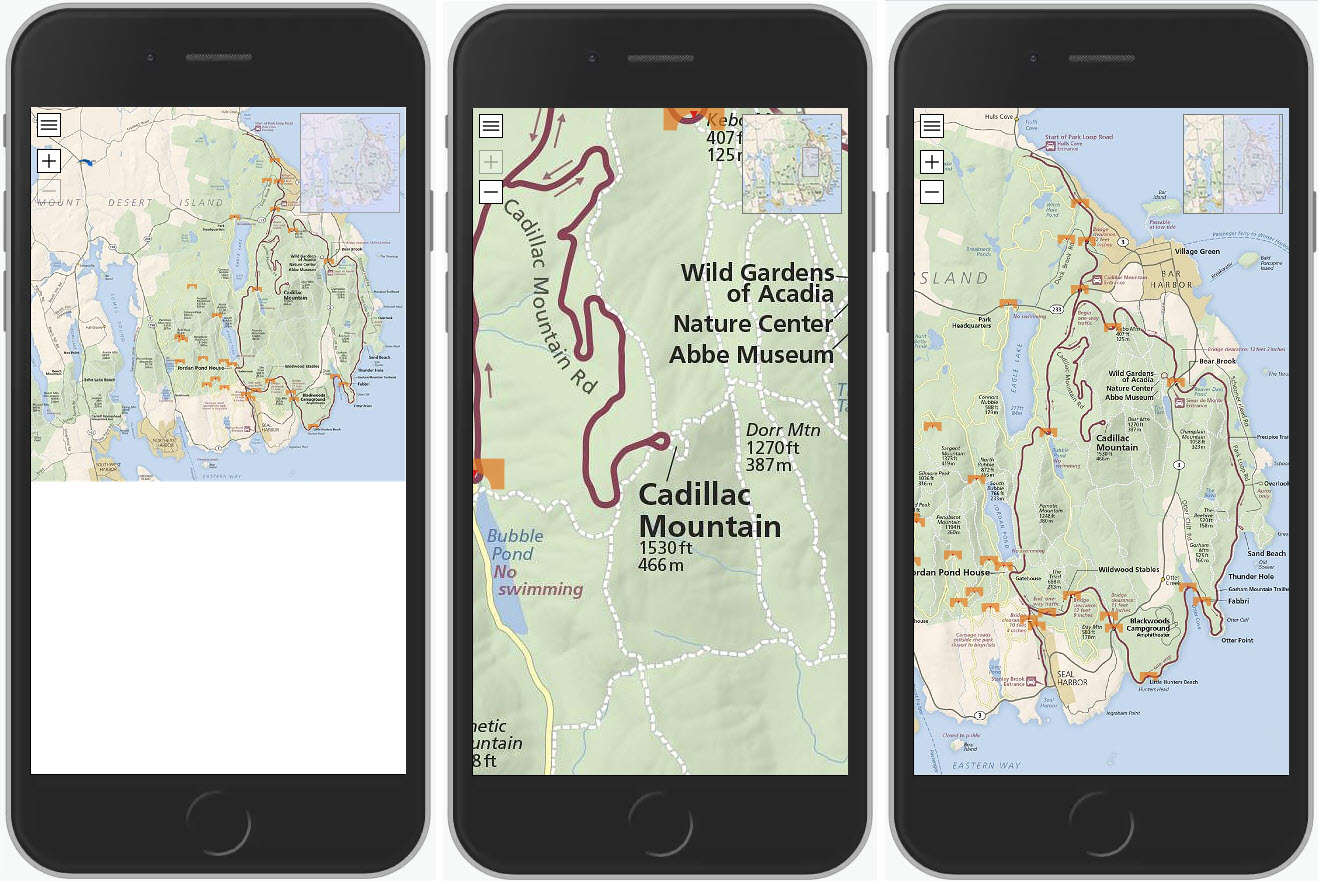
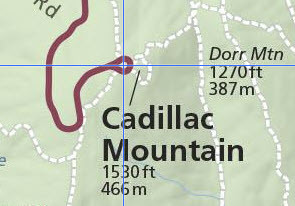
The examples below, from left to right, show the map focus as:
- Zoomed all the way out
- Zoomed in with the focus point on Cadillac Mountain
- Flex focused with the focus point on Cadillac Mountain (explained later)
Setting the map focus
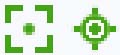
To set the map focus using the default focus point, click the Map Focus icon in the toolbar. The icon is a broken square with a dot in the center like the focusing screen in a camera. The focus will be the current zoom level and the default focus point will be the center of the viewable portion of the map in the Map Editor. To set the focus point yourself, Ctrl-click the icon and then follow the instructions to choose the focus point. In the second example above, the focus point was set to the loop at the end of the road to Cadillac Mountain.
After you set the focus, the Map Editor will display blue crosshairs to show you where the focus point is located. Also, at any time you can click the Show Focus Point icon (looks like crosshairs, located to the right of the Map Focus icon) to see how the map is focused. When you click the icon, MapsAlive will pan and zoom the map (if necessary) and display the blue crosshairs.
When a map first displays in a browser, MapsAlive will attempt to pan the map up and down, and left and right, such that the focus point is as close as possible to the center of the device's screen. Depending on the aspect ratio of the screen (tall or wide), its orientation (portrait or landscape), and where you set the focus point, the focus point may be in the exact center or off-center.
Flex Focus
Flex focus is a feature that is available only for Flex Map tours. A Flex Map tour does not have a fixed width or height, and thus, it does not have a fixed aspect ratio. A Flex Map is automatically zoomed such that its dimensions automatically adjust to use as much screen space as available in the browser or web page element that contains it.
In the Map Focus section above, in the third example, the flex focus point is set to Cadillac Mountain. MapsAlive automatically set the zoom level such that the map occupies the entire height of the screen and panned the map almost all the way to the right so that Cadillac Mountain would be horizontally centered.
Because the zoom level is determined automatically, you don't zoom the map yourself to set the focus point. Instead, you set it with the map zoomed all the way out.
To set the Flex Focus:
- Zoom the map all the way out
- Ctrl-click the Map Focus icon
- Click the CONTINUE button on the prompt
- Click on the focus point
The images below show the prompt and the blue crosshairs that appear after you click the focus point.
